
A Project Guide to Non Structural Reclaimed Beam Design Practical Guide

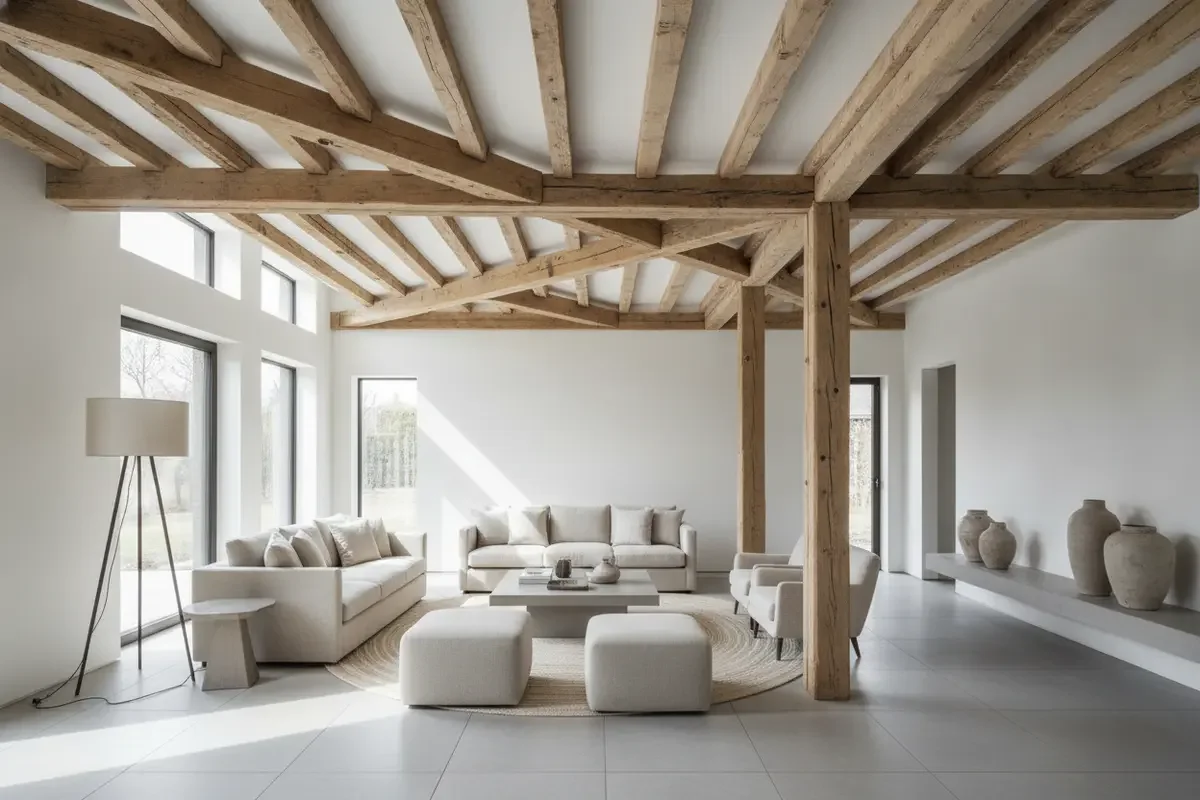
A non structural reclaimed beam design practical guide starts with one clear distinction: the beams are intended to shape the look of a room, not to carry a building load. That purpose influences the design brief, dimensions, attachment planning, finish review, and the questions to settle before a project request.
Discuss your project requirements
What does non-structural mean in a beam design?
In this guide, non-structural means a decorative beam element that is not being relied on to support a roof, floor, wall, or other building component. It can create visual rhythm, emphasize a ceiling plane, frame a focal point, or bring the character of reclaimed wood into a space. The phrase describes the design intent; it is not a substitute for project-specific review.
Do not infer that a beam is safe to use in any position or method of attachment simply because the design calls it decorative. The architect, builder, or other qualified project professional should confirm the intended role, supporting surface, attachment method, and applicable project requirements. If a beam could be mistaken for a structural member, coordinate the drawings and notes so the intended use is clear to the whole team.
Reclaimed materials can vary in dimensions and mechanical properties. A published case study on structural design using reclaimed wood describes methods for accounting for that variability; it is useful background on why material characteristics deserve attention, but it is not a design approval for a particular decorative installation. Read the reclaimed-wood structural design case study.
Which design decisions should the team make first?
Before selecting a profile or asking about availability, capture the design intent in a short brief. Name the room or project area, the effect the beams should create, and whether they will be visually prominent from the entry, seating area, or another key viewpoint. A simple plan or marked-up interior elevation often communicates more than a string of adjectives.
Purpose: State that the beams are decorative and identify what they should visually accomplish.
Location: Identify each ceiling, wall, opening, or feature where a beam is being considered.
Design character: Describe the desired overall impression, such as quiet and restrained, strongly rustic, or orderly and repetitive.
Project stage: Note whether the team is exploring concepts, developing drawings, or preparing a material request.
Decision makers: List who will review samples, approve appearance, and coordinate the installation plan.
It can help to compare the intended look with the surrounding finishes. Reclaimed wood may have visible variation in color, grain, surface marks, and character. Explain which differences are welcome and which would conflict with the design. Avoid relying on broad labels such as “weathered” without showing a reference image or sample preference.
How should dimensions and layout be documented?
Dimensions communicate the space a beam should occupy, but the design team should distinguish desired finished appearance from any structural or attachment requirements. Provide the overall length and the desired face width and depth for each beam or beam group. Identify whether the values are preliminary design targets or dimensions already coordinated with the project drawings.
Then show how the beams relate to the room. A reflected ceiling plan, elevation, or annotated photograph can document direction, spacing, endpoints, and alignment with lighting, vents, openings, or other ceiling features. If the layout changes from one room to another, identify the zones separately instead of assuming one typical detail covers all conditions.
Give each beam or beam group a simple label that appears on the plan and in the request.
Record the number of pieces and the approximate length for each label.
Mark the planned direction and the reference point used to measure each length.
Show any visible end conditions, returns, notches, or transitions that affect appearance.
Flag dimensions that still depend on field verification or later coordination.
These notes help separate the visual brief from the final construction detail. The person responsible for the building assembly should resolve how a decorative element will be supported and attached to its actual substrate. Do not treat a product dimension, photograph, or design sketch as an attachment specification.
How can the beam pattern feel intentional?
A beam layout is read as a pattern across the whole surface. Even spacing can create a calm, ordered effect. A single accent beam can focus attention on a ridge, island, fireplace, or long room axis. A tighter grouping may visually define a zone, while a more open pattern leaves more ceiling visible. Choose the approach based on room proportions and sightlines, not only on an isolated sample.
Review the layout from the places where people will see it. A ceiling plan may look balanced from above while the beams appear crowded from the room entrance. Check the relationship to windows, pendant lights, fans, sprinklers, and other visible elements. Ask the design team to identify any features that need a clear zone or a coordinated location before the beam positions are finalized.
For a clean review, compare at least two layout sketches: one with the intended beam count and spacing, and one showing the key room features. The point is not to prescribe a universal spacing rule. It is to expose conflicts and evaluate the composition in context. For projects that combine reclaimed elements with a conventional ceiling structure, the beam-wrap fit guide offers related context on coordinating a reclaimed appearance with another assembly.
Which material characteristics matter to the visual brief?
Reclaimed wood has natural variation. Decide whether the design should embrace a lively mix or aim for a more consistent overall impression. These are different selection conversations. A request for “matching beams” should explain what matching means: similar tones, similar surface character, a consistent profile, or a deliberate mix that still feels balanced.
Use reference images to communicate the desired range, but do not assume a photograph guarantees an exact appearance. Lighting, camera settings, screen display, and the individual piece all affect how material looks. When a sample review is possible, look at the material in the context of the project’s lighting and adjacent finishes. Record the decision and any acceptable range so the team has a shared reference.
Another journal chapter on reuse in timber construction discusses design approaches for reclaimed components and the challenges involved in their reuse. Its broader focus is useful when the project team is considering how reuse affects design decisions; it does not establish a product-specific specification. Explore the chapter on design with reclaimed timber components.
How should teams review samples and reference images?
Sample review works best when the team agrees on what it is judging before the review begins. One person may be looking for a close color match, while another is evaluating surface texture or the amount of visible character. Write down the decision criteria in advance and tie them to the drawings or material labels. That way, a sample conversation can answer a specific design question instead of becoming a general preference discussion.
Whenever possible, view samples under lighting that resembles the intended space, and place them near the relevant ceiling, wall, or trim finish. Look at them both up close and from the normal viewing distance. Ask the design reviewer to note the preferred examples and the range of variation that remains acceptable. A sample can help communicate direction, but it should not be treated as a promise that every delivered piece will be identical to it.
Photographs can support this review when physical samples are unavailable. Use more than one reference if the brief needs to express separate goals, and caption each image with the quality it demonstrates. For example, one image might show the desired overall color impression while another illustrates beam proportions or spacing. Avoid mixing images with conflicting goals without an explanation.
Keep a record of the decision and who approved it. If the project changes the room palette, ceiling lighting, or beam layout later, revisit the appearance review rather than assuming that an earlier approval still applies. A short note in the project file can preserve the reason behind a choice and help new team members understand the intended result.
How should finish and surface expectations be reviewed?
First decide whether the project wants to retain the wood’s existing surface character or consider additional processing. Wood Crafting materials are described as available as-is, de-nailed, or power-washed based on project requirements. Put the preference in the request and ask what options apply to the specific material under consideration. Avoid assuming that a particular treatment will create a uniform color or surface.
Finish planning should consider the full assembly and the intended viewing distance. A close-up feature wall may call attention to texture that would barely register overhead. The design professional should coordinate any finish product, application, compatibility, and maintenance requirements with the material and the project conditions. The material supplier can discuss the product and requested processing, but the project’s design and installation decisions belong with the responsible project team.
When the beam look must relate to other wood surfaces, compare those elements together. A beam’s tone may appear different beside new flooring, painted trim, or a lighter ceiling than it did in isolation. A sample board or a side-by-side image review can help the team decide whether contrast is intentional or whether the scheme needs adjusting. The reclaimed beam finishing guide can support a separate review of finish considerations.
What should a non-structural beam request include?
A useful request gives the supplier enough context to discuss relevant material options without asking the supplier to invent missing project decisions. For a multi-room or commercial project, organize the information by zone. Keep the drawings, quantity notes, appearance references, and delivery location aligned with the same labels.
Request itemWhat to provideWhy it helpsProject roleState that the beams are decorative and identify the responsible professional for assembly review.Keeps the material conversation distinct from structural and attachment decisions.LayoutPlan or elevation with locations, direction, labels, and key adjacent features.Shows how the material will read across the room and where coordination matters.Dimensions and quantityLengths, desired face dimensions, piece count, and whether values are preliminary.Helps the team understand the requested scope and identify open questions.AppearanceReference images and notes on color range, texture, marks, and variation.Creates a shared basis for discussing character and sample review.ProcessingIndicate whether the team is considering as-is, de-nailed, or power-washed material.Surfaces processing preferences for project-specific discussion.Project logisticsDelivery location, timing needs, site access notes, and the person coordinating receipt.Allows the request conversation to account for the project context.Open decisionsList items still under review, including field dimensions or finish choices.Prevents preliminary assumptions from being mistaken for approved requirements.
Include approximate project scale and the number of zones, especially when the request covers a development, hospitality space, or larger home. A clear project outline is more useful than a single unannotated image. If the visual goal is a mantel or a focal beam rather than a ceiling composition, the reclaimed wood mantel beam buyer guide explores that distinct application.
How can drawings show the beam design clearly?
A useful drawing set connects a beam’s appearance to its position without implying details that have not been resolved. Use one plan to show the overall pattern and separate enlarged views for unusual conditions. Label the ceiling height or other reference information that helps the team understand the proportion, and identify the viewing direction when a beam’s visible face matters to the design.
For each beam type, a simple schedule can track the label, location, approximate length, desired face dimensions, quantity, and status. A status column might distinguish “concept,” “under review,” and “coordinated,” so preliminary design intent is not confused with a confirmed order detail. If a beam group repeats across multiple rooms, note the repeated locations rather than leaving the team to infer them from a single example.
Pay particular attention to end conditions and transitions. A beam that terminates at a wall, meets another beam, or crosses a change in ceiling plane will be seen differently than an uninterrupted run. A sketch or elevation can identify the intended visual endpoint. Questions about cuts, joints, or attachment should be directed to the professional responsible for those project details; the design sketch should not be treated as construction direction.
It is also useful to keep an image reference sheet with captions. Identify what each image illustrates: color range, surface texture, beam proportion, spacing, or the overall mood. One reference rarely communicates every attribute. Separating these goals helps avoid a situation where the team approves the layout but assumes that approval also settles finish or material variation.
How do teams coordinate design with the material conversation?
Keep design, material selection, and construction coordination connected, but do not collapse them into one decision. The architect or designer can define the intended appearance and location. The builder or other qualified professional can coordinate the attachment and site conditions. The supplier conversation can focus on available product characteristics, requested dimensions, and processing preferences. Confirm who owns each decision and when it must be settled.
For a larger scope, group the request by room or elevation and identify what is common versus unique. If a design revision changes length, quantity, or appearance expectations, send the updated information as a new, clearly dated version. This reduces the risk of a supplier reviewing a superseded drawing or the project team discussing different versions.
Do not assume that a design concept establishes product availability or final quantities. Confirm the specific project scope with the supplier, and have the project team verify measurements and assembly details. If the project includes reclaimed beams in a home addition, see the home addition planning guide for related coordination considerations. For broader sourcing questions, the guide to sourcing reclaimed wood beams provides a useful companion.
How does the project scale change the planning brief?
A single-room project may need one marked-up elevation, a short beam schedule, and a few appearance references. A larger home or commercial scope usually needs more organization because the same design may repeat across multiple rooms, levels, or zones. Identify each area clearly and explain whether it should follow a shared appearance standard or has its own design direction.
For repeated conditions, define what is intended to stay consistent, such as the general profile, layout rhythm, or visual range. Then note where the design intentionally changes. A reception area might use a stronger focal pattern than adjoining circulation space, for example. The brief should make that variation explicit rather than leaving the supplier or builder to infer it from separate drawings.
Projects with many stakeholders also benefit from a simple review path. Identify who consolidates design comments, who confirms the final material scope, and who handles site measurements and receipt coordination. When comments are collected from several rooms or reviewers, a single updated schedule can clarify which changes are approved and which are still questions. This is especially helpful when drawings are revised while the project is discussing material options.
Scale does not change the basic rule: separate visual intent from structural and installation decisions. It does change how much labeling and version control may be needed to keep everyone discussing the same locations and quantities.
What common planning gaps can a brief prevent?
Small gaps in a design request can create avoidable follow-up. Before sending the brief, check for these common issues:
Unclear use: The drawings show a beam but do not state whether it is decorative or part of a load-bearing design. Clarify the intended role.
Dimensions without context: A length appears without a location, reference point, or note about whether it is final. Label it on the plan and mark its status.
Vague appearance language: Words such as “uniform” or “rustic” have no shared definition. Add example images and describe acceptable variation.
Uncoordinated ceiling features: Beam lines overlap with lighting or other visible components. Review the layout with the relevant plans before finalizing.
Assumed finish outcome: A requested process is treated as a promise of a particular color or surface. Separate process preference from appearance approval.
Missing project scale: A request describes one beam when the actual scope covers several zones. Provide counts and organize pieces by location.
Unclear decision owner: No one is identified to approve samples or resolve open questions. Name the appropriate project contact for each decision.
These checks matter because reclaimed material is selected for character as well as dimensions. A useful brief makes room for that character while clearly documenting the project's practical requirements. For a related comparison of design roles, review structural and decorative reclaimed beam considerations; use it as background, not a substitute for professional project review.
What should the team confirm before requesting a quote?
Before requesting project-specific information, gather the details that are most likely to shape the conversation: project location, intended decorative use, approximate scope, dimensions, appearance references, processing preference, and timing context. Note what is still being decided. A quote request does not need to pretend every design choice is final, but it should distinguish confirmed information from early assumptions.
Wood Crafting focuses on reclaimed wood siding and paneling and also offers reclaimed beams. Its beam information includes custom specifications for structural and decorative applications, but that does not make the supplier the project's structural designer or installer. A project team should review the reclaimed beams product information alongside its own drawings and requirements. Teams considering alternative applications can also review the reclaimed wood beams overview.
For a pricing-focused overview of the request process, the reclaimed beam buyer guide to costs and quotes offers related reading. Prices and project scope depend on the specific request; provide the relevant information rather than relying on a generic figure.
Request a project-specific quote discussion
Frequently Asked Questions
Can a decorative reclaimed beam be assumed to be non-load-bearing?
No. The design team must state and verify the intended role for the actual project. A decorative appearance alone does not determine whether a member carries load, and this guide is not an engineering review.
What dimensions should I include in an initial request?
Provide the approximate length, desired face width and depth, quantity, and the location for each beam or group. Mark whether dimensions are preliminary or coordinated, and include an annotated plan or elevation when available.
Can several reclaimed beams be expected to look identical?
Do not assume exact visual uniformity. Reclaimed wood can show natural differences in tone, grain, surface marks, and character. Share references, define the range that suits the project, and ask about reviewing samples or material options.
Who determines how the beams are attached?
The project’s qualified design and construction professionals should determine and coordinate the support and attachment approach for the actual site and substrate. A product discussion or design illustration does not establish installation instructions.
What is the most useful first step for a larger project?
Prepare a concise brief with the project location, decorative intent, marked-up layout, approximate dimensions and quantity, visual references, processing preferences, and unresolved decisions. This gives the supplier and project team a more useful starting point.
Ready to prepare a project-specific request?
Use the design brief to make the beam pattern, appearance expectations, scope, and open decisions visible to everyone involved. With the intended role clearly stated and project professionals responsible for assembly coordination, the material conversation can focus on the reclaimed wood options that fit the project.